自制操作系统(CoolOS) - Hello World
Posted

要写一个操作系统,应该从哪里开始呢?当然是启动。那么就先写一个简单的bootloader,让它能在启动的时候打印简单的字符串。
开始
那么,用啥写呢?当然是汇编语言。
要在启动的时候打印字符串,就得依赖于BIOS。BIOS是工作在实模式下的,所以我们写的汇编应该是16位汇编。
	[BITS 16]				; tell the assembler that its a 16 bit code
	[ORG 0x7c00]			; tells the assembler that where the code will
[BITS 16]用来告诉汇编器这是16位代码。因为该部分代码(第一扇区)在启动时会被读到内存的0x7c00处。[ORG 0x7c00]就是用来告诉汇编器,这部分代码将会被读取到内存0x7c00处。所以汇编器在将代码翻译成机器码,计算地址时就会按照0x7c00来进行计算。只有这样,接下来的代码才会正确执行。
接下来这段代码是标准FAT12格式软盘专用的代码 :
; Stand FAT12 format floppy code(Reference: http://wiki.osdev.org/FAT#FAT_12)
; BPB (BIOS Parameter Block)

	JMP		entry			; jump to entry
	DB		0x90			; NOP
	DB		" CoolOS "		; OEM identifier,must 8 bytes.
	DW		512				; The number of Bytes per sector
	DB		1				; Number of sectors per cluster.
	DW		1				; Number of reserved sectors.
	DB		2				; Number of File Allocation Tables (FAT's) on the storage media.(Often this value is 2)
	DW		224				; Number of directory entries.
	DW		2880			; The total sectors in the logical volume.
	DB		0xf0			; This Byte indicates the media descriptor type.
	DW		9				; Number of sectors per FAT.
	DW		18				; Number of sectors per track.
	DW		2				; Number of heads or sides on the storage media.
	DD		0				; Number of hidden sectors.
	DD		2880			; Large amount of sector on media.
	DB		0				; Drive number.
	DB		0				; Flags in Windows NT.
	DB		0x29			; Signature (must be 0x28 or 0x29).
	DD		0xffffffff		; VolumeID 'Serial' number.
	DB		"CoolOS     "	; Volume label string,must 11 bytes.
	DB		"FAT12   "		; System identifier string.must 8 bytest.
详细可参考 FAT - OSDev.
需要注意的是,上面的JMP entry指令必须在最前,因为如果没有这一条跳转指令,接下来的一连串DB都是伪指令,是不能被执行的。这就会导致entry后面的所有指令都执行不到,那么这个bootloader当然也就不能正常启动咯。
再接下来,就是真正的启动代码了。首先,我们需要初始化寄存器:
; Init the register
; BIOS have set CS to 0x0000,set IP to 0x7C00
; We need to init SS and SP
; There are almost 30 KiB at 0x00500~0x07BFF is guaranteed free for use,
; So,set SS to 0x0000,set SP to 0x7c00,when we first push (SP-2)
; Reference: http://wiki.osdev.org/Memory_Map_(x86)#Overview
; Reference: https://en.wikipedia.org/wiki/BIOS#Boot_environment
	MOV		AX,0
	MOV		SS,AX
	MOV		SP,0x7c00
	MOV		DS,AX
	MOV		SI,msg			; Move the message to SI
在执行这一段代码前,BIOS已经将CS设置为了0x0000,IP设置为了0x7c00。接下来,我们需要初始化SS和SP,其实就是初始化堆栈,因为后面的INT中断的时候是需要用到堆栈的。通过参考**Memory_Map_(x86)**,发现在0x00500~0x07BFF之间有大约30KIB的内存是供自由使用的,所以,设置SS为0x0000,SP为0x7c00。第一次压栈时,SP会变成0x7BFE。同时,初始化DS为0x0000。将需要打印的字符串的地址(即msg)保存到SI中,方便后续使用。
紧接着,就到了打印字符串的时候了:
putloop:
	MOV		AL,[SI]
	ADD		SI,1
	CMP		AL,0
	JE		fin				; Done!jump to fin
	MOV		AH,0x0e			; Display a character
	MOV		BX,15			; Color
	INT		0x10			; Bios video display.Reference: http://www.ctyme.com/intr/rb-0106.htm
	JMP		putloop
循环将每个字符放到AL中,然后将SI的值加一,移到下一个字符,然后设置AH为0x0e,并调用0x10中断(参考**[Interrupt Jump Table](http://www.ctyme.com /intr/rb-0106.htm)**),打印AL中的字符。一直到,AL中的值为0,即字符串打印结束。然后,跳转到fin进行无限循环。
; Infinite loop
fin:
	HLT						; Halt
	JMP		fin				; Loop
我们把需要打印的字符串放到最后:
; Message
msg:
	DB		0x0a, 0x0a	    ; Two line feed
	DB		"************"
	DB		0x0d			; One carriage return
	DB		0x0a			; One line feed.0x0d+0x0a==\n
	DB		"Hello World"
	DB		0x0d			; One carriage return
	DB		0x0a			; One line feed
	DB		"This is CoolOS"
	DB		0x0d			; One carriage return
	DB		0x0a			; One line feed
	DB		"Author: Cool"
	DB		0x0d			; One carriage return
	DB		0x0a			; One line feed
	DB		"Blog: http://www.coolcodes.me"
	DB		0x0d			; One carriage return
	DB		0x0a			; One line feed
	DB		"************"
	DB		0x0d			; One carriage return
	DB		0x0a			; One line feed
	DB		0				; End of String
其中0x0d为回车,0x0a为换行。这里的回车和我们平时说的可不大一样,这里的回车相当于把光标移动到行首,但不换行。换行需要0x0a来干。它两需要一起使用,即0x0d+0x0a才相当于我们平时所说的回车。
最后,我们需要把第一个扇区(512字节)给填满:
	TIMES 510-($-$$) db 0   ; Fill the rest of sector with 0
	DB	0x55, 0xaa          ; Add boot signature at the end of bootloader
因为咋们上面的代码翻译成机器码后还不足512字节,所以剩下的需要用0来填,也就是TIMES 510-($-$$) db 0,这里的TIMES是伪指令(参考**NASM - 3.2.5 TIMES**),其实就是重复后面的指令或数据。这里就是重复db 0,重复多少次呢?重复510-($-$$)次。这里的$是指当前行行首的位置(相当于地址),而$$指当前section的位置(地址),在这里也就是整个代码的开始(参考**NASM - 3.5 Expressions**)。那么,$-$$也就是目前代码所占用的字节数。用510减去$-$$不就知道需要填多少0了。但注意到,上面是用510去减的,而不是512。因为最后两个字节不能为0。要想作为bootloader,需要最后两个字节为0x55和0xaa。不然,BIOS会认为不是这bootloader,它是不会尝试去执行上面的代码的。
代码终于完了,下面贴一个完整的代码:
; File: hello_world.asm
; Author: si9ma
; Blog: http://www.coolcodes.me
; Mode: 16 bits
; Syntax: NASM
; Function: Print a "hello" message on the screen when boot

	[BITS 16]				; tell the assembler that its a 16 bit code
	[ORG 0x7c00]			; tells the assembler that where the code will

; Stand FAT12 format floppy code(Reference: http://wiki.osdev.org/FAT#FAT_12)
; BPB (BIOS Parameter Block)

	JMP		entry			; jump to entry
	DB		0x90			; NOP
	DB		" CoolOS "		; OEM identifier,must 8 bytes.
	DW		512				; The number of Bytes per sector
	DB		1				; Number of sectors per cluster.
	DW		1				; Number of reserved sectors.
	DB		2				; Number of File Allocation Tables (FAT's) on the storage media.(Often this value is 2)
	DW		224				; Number of directory entries.
	DW		2880			; The total sectors in the logical volume.
	DB		0xf0			; This Byte indicates the media descriptor type.
	DW		9				; Number of sectors per FAT.
	DW		18				; Number of sectors per track.
	DW		2				; Number of heads or sides on the storage media.
	DD		0				; Number of hidden sectors.
	DD		2880			; Large amount of sector on media.
	DB		0				; Drive number.
	DB		0				; Flags in Windows NT.
	DB		0x29			; Signature (must be 0x28 or 0x29).
	DD		0xffffffff		; VolumeID 'Serial' number.
	DB		"CoolOS     "	; Volume label string,must 11 bytes.
	DB		"FAT12   "		; System identifier string.must 8 bytest.

; Boot Code
entry:

; Init the register
; BIOS have set CS to 0x0000,set IP to 0x7C00
; We need to init SS and SP
; There are almost 30 KiB at 0x00500~0x07BFF is guaranteed free for use,
; So,set SS to 0x0000,set SP to 0x7c00,when we first push (SP-2)
; Reference: http://wiki.osdev.org/Memory_Map_(x86)#Overview
; Reference: https://en.wikipedia.org/wiki/BIOS#Boot_environment
	MOV		AX,0
	MOV		SS,AX
	MOV		SP,0x7c00
	MOV		DS,AX
	MOV		SI,msg			; Move the message to SI

putloop:
	MOV		AL,[SI]
	ADD		SI,1
	CMP		AL,0
	JE		fin				; Done!jump to fin
	MOV		AH,0x0e			; Display a character
	MOV		BX,15			; Color
	INT		0x10			; Bios video display.Reference: http://www.ctyme.com/intr/rb-0106.htm
	JMP		putloop

; Infinite loop
fin:
	HLT						; Halt
	JMP		fin				; Loop

; Message
msg:
	DB		0x0a, 0x0a	    ; Two line feed
	DB		"************"
	DB		0x0d			; One carriage return
	DB		0x0a			; One line feed.0x0d+0x0a==\n
	DB		"Hello World"
	DB		0x0d			; One carriage return
	DB		0x0a			; One line feed
	DB		"This is CoolOS"
	DB		0x0d			; One carriage return
	DB		0x0a			; One line feed
	DB		"Author: si9ma"
	DB		0x0d			; One carriage return
	DB		0x0a			; One line feed
	DB		"Blog: http://www.coolcodes.me"
	DB		0x0d			; One carriage return
	DB		0x0a			; One line feed
	DB		"************"
	DB		0x0d			; One carriage return
	DB		0x0a			; One line feed
	DB		0				; End of String

	TIMES 510-($-$$) db 0   ; Fill the rest of sector with 0
	DB	0x55, 0xaa          ; Add boot signature at the end of bootloader
Makefile
接下来,写个Makefile。
# Author: si9ma
# Blog: http://www.coolcodes.me

# Img file we will use to boot
IMG=CoolOS.img

# detect architecture for qemu Smartly.
ifeq ($(shell uname -m),x86_64)
	QEMU=qemu-system-x86_64
else
	QEMU=qemu-system-i386
endif

img:hello_world.bin
	dd if=/dev/zero of=$(IMG) count=2880 bs=512 	# Create a empty img file with size 2880*512 bytes
	dd if=hello_world.bin of=$(IMG) bs=512 conv=notrunc	# add hello_world.bin to the first sector of img file(use conv=notrunc)

hello_world.bin:
	nasm -f bin -o hello_world.bin hello_world.asm

run:
	make img			# Update img file firstly.
	$(QEMU) -drive file=$(IMG),if=floppy

clean:
	rm hello_world.bin $(IMG)
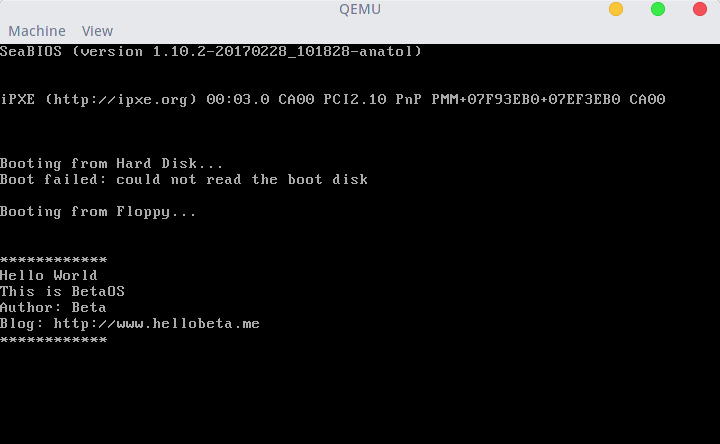
测试
执行:
make run
运行结果:
最后,来看一下上面那段标准FAT12格式软盘专用的代码到底是干嘛的。
执行:
file CoolOS.img
输出:
CoolOS.img: DOS/MBR boot sector, code offset 0x3c+2, OEM-ID " CoolOS ", root entries 224, sectors 2880 (volumes <=32 MB), sectors/FAT 9, sectors/track 18, sectors 2880 (volumes > 32 MB), serial number 0xffffffff, label: "CoolOS ", FAT (12 bit)
可以看出,这段代码其实就是FAT12格式化代码。